Saturday 22 December 2012

The Dark Horse

I bought a pig in a poke.

For $10 on eBay I got an old ten-speed racer. A big framed Graecross Capri, with a 61cm (24inch) seat post and lots of rust.

After I stripped it back to the frame it looked like this...


And when I had it prepped and powder coated it looked like this...


Nice... Lewis & Sons in Morningside do a lot of bike frames. One of the sons is a BMX fan and takes care masking all the holes in the frame and keeping the powder out of the threads.


I started planning how to rebuild it...


There were a couple of options. The main problem was the size of the rear wheel hub. I was definitely going to need a new wheel set. The old ones were rusted beyond repair, but the rear frame spacing, the gap between the rear drop outs, where the wheel hub sits, was only 120mm.

Modern derailleur geared bikes carry 10 or more rear sprockets, in a cassette that fits on a freewheeling hub with an overlock nut dimension of 130mm or more. But this 20 year old frame was build to fit a 120mm treaded hub with a 5-speed freewheel. A new set of standard road wheels was not going to fit.

I could set up the bike as a single speed / fixe, using a 120mm track hub. I tried this out using the rear wheel from my dingle bike.


But if I wanted to build a bike with gears, I really only had two choices. I could use an internal geared hub, or try to find an old style wheel set like the one the bike originally came with. 

(Sheldon Brown can tell you how to cold set, or bend a frame to fit a wider hub, so there is a third option for those brave enough.)

Luckily, the bicycle designs that were state-of-the-art in the 70s are still being manufactured in factories in Taiwan and China. This on-line bike store had a good range of the parts I needed, and I also got some from this eBay store. I went for cheap and cheerful, in keeping with the spirit of the 70s 10-speed, except maybe not the suicide brakes

I was going to need a new wheel set, brakes and probably gears, bars and stem, but not all the old components were beyond salvage. The bottom bracket looked like this when I got the bike...


But after I soaked them in turpentine, cleaned them up and lightly sanded off some surface rust, the bottom bracket and head set parts looked like this...


Ready to pop back in to the frame with some grease and new ball bearings.


I also chose to keep the old stem shifters, partly because I liked this bolt-on down tube cable stop that went with them.


It polished up nicely with it's shiny Shimano brand showing. I think it's chrome plated, it's flaking off a little in the corners. The main bearings themselves are more or less stainless steel, but the shifters are something else. Not as shiny, and more rust prone, after a bit of work, you could read the brand and the message PRODUCT OF SINGAPORE.


I'm not an expert in asian industrial history, but I remember growing up in the 70s. There was a kind of inter-generational disconnect in attitudes about asian manufactured goods. Adults would say "made in Japan" with a sneer, expecting poor quality materials and work. That may have been true in the 50's and 60's, but kids knew that in the 70's lots of cool things, electronic equipment, bicycles, sporting goods and just about every decent toy that you wanted, came from Japan. Things made in Hong Kong or Singapore, were more likely to break and were a lot cheaper.

The word kaizen was first used to refer to industrial process control in 1951, in an American sponsored management training film titled Kaizen eno Yon Dankai, "Improvement in four steps". Japanese industry, particularly Toyota, took this idea of "continuous quality improvement", spun it into a culture and sold it back to the US via Anthony Robbins and co. They also developed in to the world's second largest economy and the great industrial innovators of the late twentieth century.

My old bike's origins had been glossed over when it was sold. A sticker on the frame said that it was "manufactured for Graecross industries Aust". I think the major part of the bike, the frame and the main bearings, came from Japan, where the heavier industrial processes of casting, machining and tube drawing were established, but the shifters from Singapore, show the movement off shore of lighter cutting and forming processes, as the Japanese economy started to heat up and industries started looking to save costs on cheaper real estate and lower wages.

Over the next few decades the changes continued. Now days something made in Hong Kong or Singapore is more likely to be a complex financial derivative than a simple bicycle part, and in Korea, Kia is looking like the new Toyota and Samsung is taking over the world of electronics. Most of the cheap and cheerful new parts for my 10-speed rebuild came from Taiwan or mainland China and the quality is not bad. It may not be too many more years before cyclists are looking for high end boutique parts from Shenzhen and getting their basic components from Borneo or West Africa. (Actually your boutique carbon frame probably already comes from China. Does the label say "manufactured for...")

So here's my cheap and cheerful restoration of a circa 1970s ten speed racer....


I probably could have cleaned up the old derailleurs, but it wasn't worth the work for the price of these brand new ones.


I already had some 170mm cranks, pedals and chainrings. I think they look ok and the sizes work.


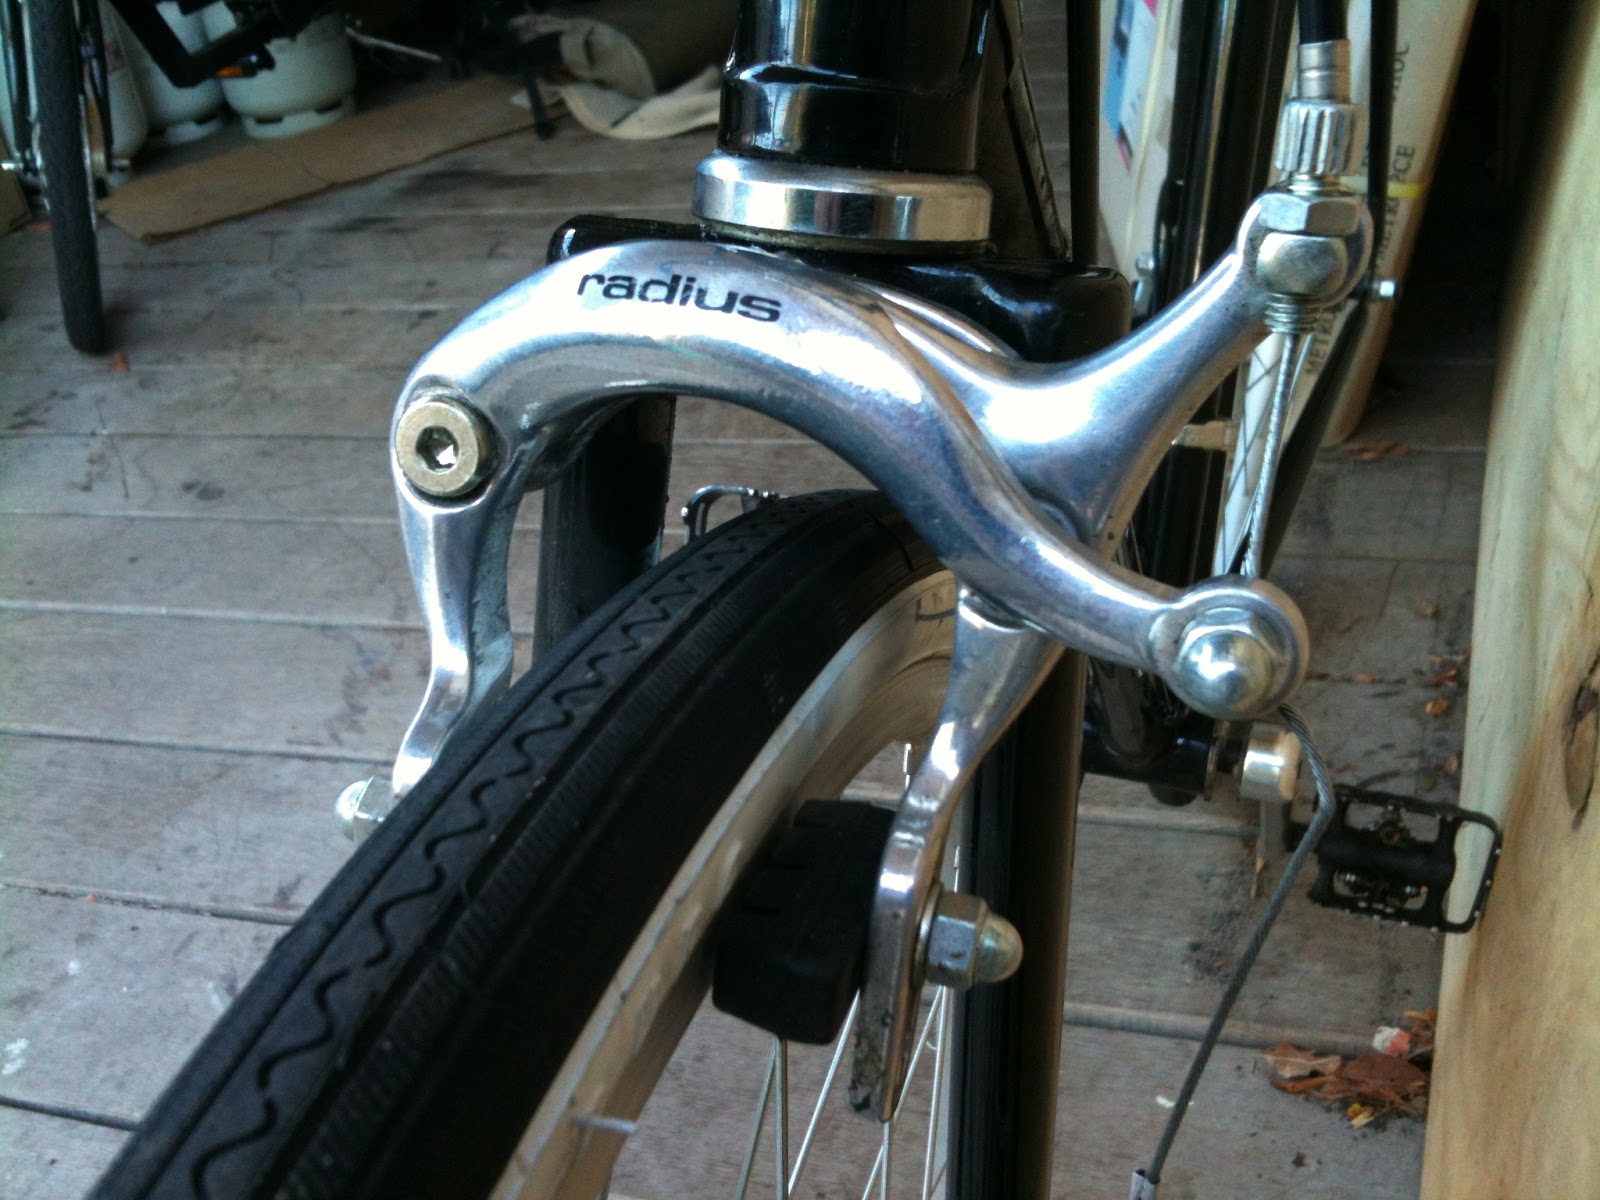
These chunky double pivot caliper brakes are not the most streamlined you can get, but they will stop the bike and the 100kg rider going downhill.


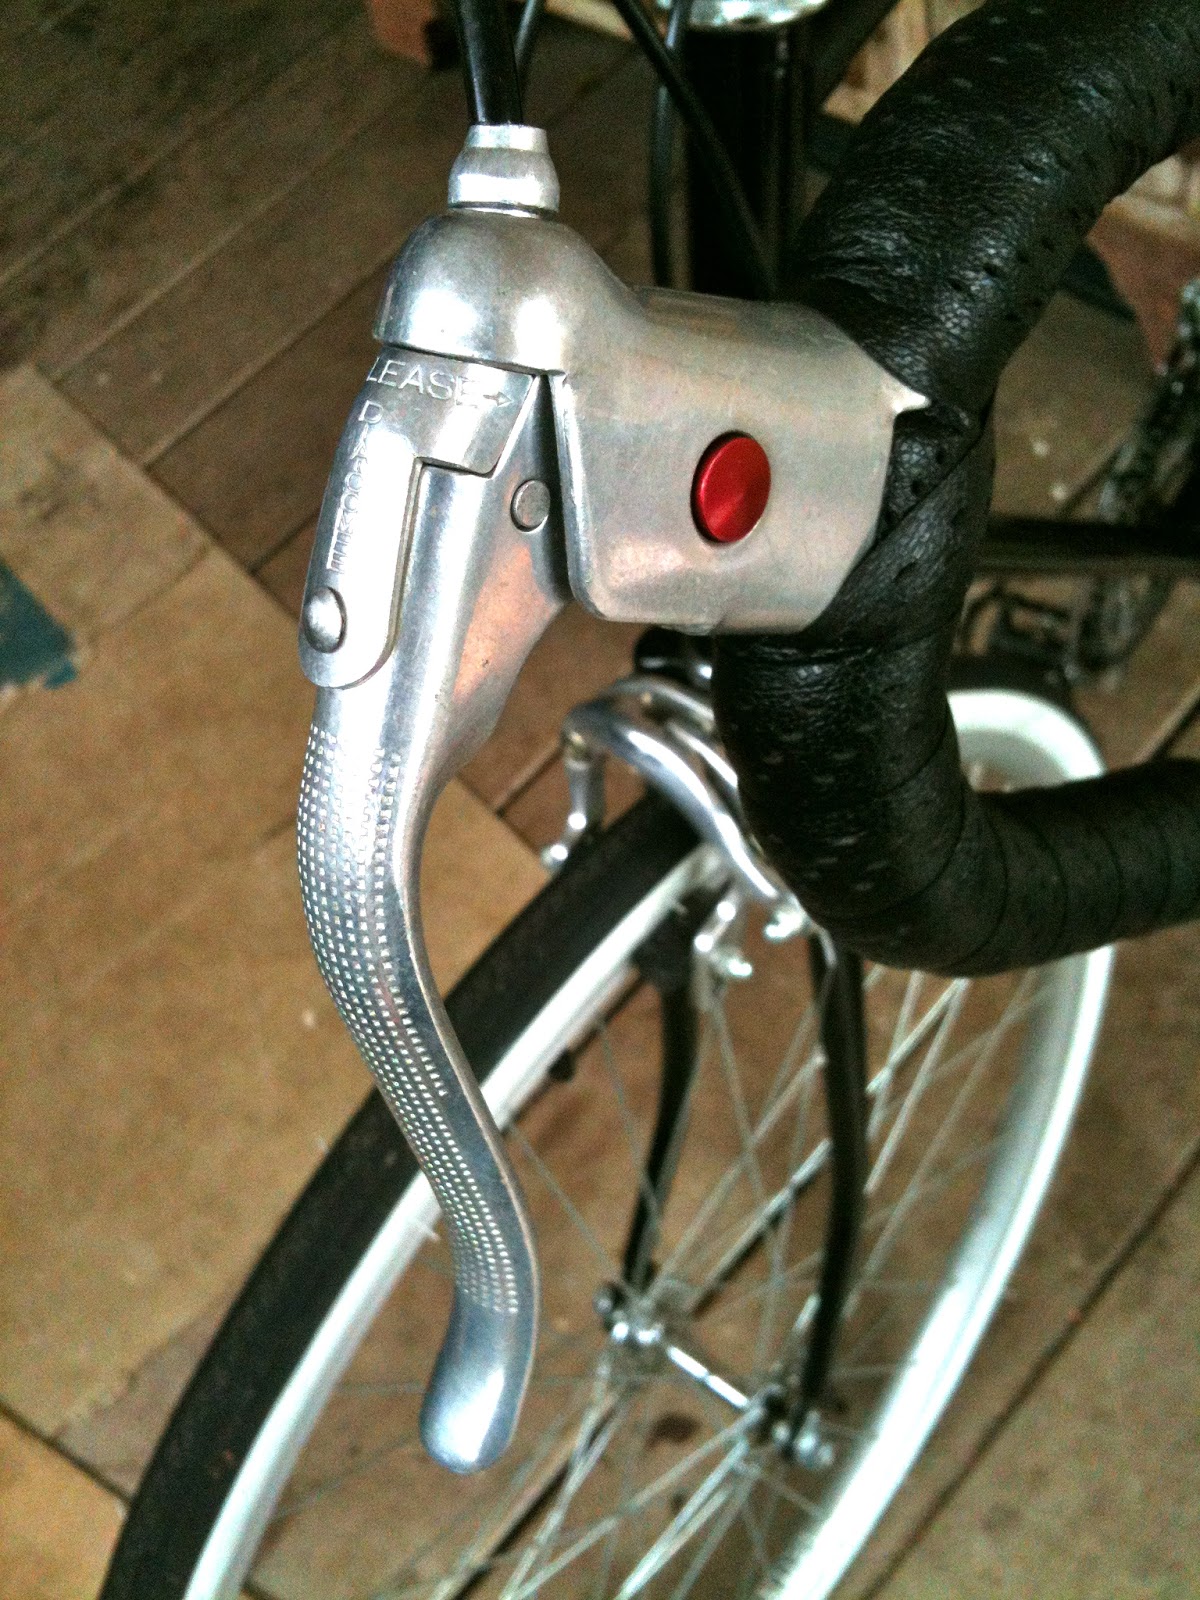
I remember Diacompe components from my childhood. The other brand that wasn't Shimano, and a bit of a step up. They invented the suicide levers the bike originally came with. Apparently they traded the design in an intellectual property deal with European brake manufacturer Weinmann and became the leading Japanese brake supplier before Shimano.

These new levers are safer and I like the look. They're not Aero!? The quick release for the brakes is in the lever!  Now made in Taiwan.


These new 27" single wall aluminium rims are built on Joy Tech hubs that look like exactly like the ones on the bike when I bought it.


I kept the old saddle and I quite like it, although it does have a few holes.


And to ward off accidents, this brass temple bell.


So I start off down the hill outside my front door and chase the middle aged men in lycra. See if I can overtake them on the outside of the down hill corner on the way to the ferry stop, or on the inside of the round about.

One of my mates from uni has come back to town from Victoria. He says he hasn't cycled much since he decided not to turn professional out of high school. He alway rode a motor bike when I knew him, but he's got his old road bike working and we've been riding loops around the river on Sunday mornings. I've found a web site that has 27" racing tyres and I'm waiting for my order to arrive.


Monday 5 November 2012

A Pig in a Poke


I got the flu over winter. It seems to happen more now I've got small kids. And it hangs around for longer.

I got out of condition and didn't find the 52-16/18 two speed dingle bike so easy to ride anymore.

So I started thinking about a bike with gears... and I found this on ebay.


From the pictures the seller had posted I could see it was a big frame. You can see the head tube is enormous compared to tubing diameter. I liked the horizontal drop outs which could fit a single speed or hub gear option. And I liked the $9.50 I paid for it.


Obviously it needed a bit of work. Which was part of the attraction.

The expression a pig in a poke, is a warning about buying goods you can't inspect properly beforehand... clearly there was no ebay in medieval europe. I didn't really pay much attention to it, and I didn't really take a proper look at the bike till I got it back from Burpengary where I'd picked it up.

What did I find?

The stickers say Graecross Capri (with Pro-Bike apparently added later).


It was "manufactured for" Graecross Industries (Aust P/L) Bayswater Victoria 3153.


And sold by Kev OLSEN Cycles Toowoomba.


Coincidently, I grew up in Toowoomba. I don't remember Kev Olsen cycles but I do remember 6 digit phone numbers. I'm pretty sure that makes this bike nearly 20 years old at least.

The Internet doesn't know a lot about Graecross cycles. It was one of the brands acquired by Pacific Dunlop when it took over Malvern Star around 1992. There's a  blogger in Melbourne with a bit of a fetish for taking pictures of a particular step-through model. The collectors on this bike forum posted this magazine article from 1984 (I think).


Some times the groovy 70's type face is misread as Sraecross.

After looking at the various Graecrosses for sale on line, my guess is that they made low end to fairly decent road bikes in the 70's and 80's....
 (This one on flickr is probably not quite as old as mine.) 

... before the brand ended up on a range of basic mountain bikes and kids bikes in the 90's. 

 Maybe after the original company was bought out?

Mine is a "Ten-Speed Racer", I guess from the 70's or early 80's, of basic to mid-range quality. I think the "Pro-Bike" sticker is marketing, not a real sign of quality. I rode something like it in primary school but it was white, a fair bit smaller and branded "Toyosha - made by the Toyota Auto Body Company". I suspect this one was also made in Japan, the frame at least. That's what "manufactured for Graecross" probably means. The gears are Shimano Tourney, which the net says was a mid level group. The brakes say "Star Brand". The hubs are Joytech (Taiwanese) and the shifters say "Product of Singapore"(under the rust).  Sheldon Brown's articles on cable installation, freewheelsframe spacingbrake extension levers and stem shifters gave me some clues about the age of the bike. 

Look at these features.

Rear derailleur hanging from the axel not the frame.

5-speed freewheel on a threaded hub, not a multispeed cassette on a freehub.

120mm rear frame spacing. That's narrow by today's standards.

Cables above the bottom bracket. Pre-mid-80's style.

Stem shifters, late 70's early 80's. Threaded headset. (Rust.)

"Suicide" brake lever extensions. Another 70's feature for riding a "racing" bike in an upright position. These days you can get interrupters which have the advantage of actually working to apply the brakes.

"27 inch" steel wheels (rusty), with axle nuts not quick release.

The spokes are broken but the tyre is still holding air!

Straight seat post with a clamp. Vinyl covered plastic saddle.

Brakes (basic single pivot side pull callipers with cable adjusters but not quick release) and reflectors and rust.


Cotterless cranks with a "pie plate"chain guard (and lots of rust).

Cup and cone bottom bracket not a cartridge (with even more rust).

The frame was OK but most of the gear looked like it would have to be replaced... if I could get it off! And I wasn't really sure if I could get new parts that would work, especially with the narrow rear drop out spacing. Maybe I had bitten off more than I could chew.

So I got out the angle grinder!

I needed that to cut the chain and get the old kick stand off... which I managed to do without cutting the frame. But then everything else came apart fairly easily with some basic tools and a bit of muscle. Maybe a sign that the components weren't too poor quality, some of them at least. The head set races came out with a few taps from a hammer and steel bar. And the frame was stripped ready to be painted.


In the mean time I started planning how I was going to rebuild it.


More later.

Monday 15 October 2012

remove pheasant brand freewheel

I've been looking at my blog's stats.... I know from my referring sites that I get almost as many visits from google.co.uk as I do from google.com.au (people that might actually know me), and I know from the search keywords that what most people who end up on my blog really want to know is how to remove a pheasant brand freewheel!

Until now you would have been sent to my post on  dingle gearing, where you could have found a picture of a pheasant brand freewheel and a link to freewheel-destructive-removal on the Park Tools website, which probably would have helped you get your freewheel off.

But here is some more specific information which might be what you are looking for.

I have a very basic workshop without a lot of special tools... The Park Tools page gives excellent instructions, but you can get your freewheel off without a pin spanner or bench vise and it may even work better on difficult to remove freewheels. These methods will also work if you want to remove a dicta brand freewheel, an unbranded freewheel, any low cost freewheel from China or Tiawan, any freewheel without, or with inadequate fittings for a removal tool, or if you can't get the tool that fits the freewheel you have. The freewheel will be dismantled and probably damaged in the process so don't do this to an expensive freewheel that you might want to reuse.


Leave the tyre on the wheel for better grip. Sit on the floor holding the wheel with your legs. Get a hammer and a small tipped punch. You might like to wear safety glasses, and be prepared for ball bearings to go everywhere.

You can unscrew the freewheel bearing cone (the flat metal ring with the brand stamped on it), by using the punch in one of the small pin holes to drive it clockwise. Don't worry about overtightening it by turning it the wrong way, you can't do it. If it doesn't move just hit it harder...HARDER!

After you've removed the bearing cone, the rest of the freewheel will come  apart except for the inner body which is screwed on to the wheel's threaded hub. The inner body has cut outs to accomodate the pawls springing back from the outer body when freewheeling. You can place the punch against one of these surfaces and unscrew the inner body by driving it anticlockwise... this time you can drive it the wrong way, so if it doesn't move, check that you are driving it the right way... then HIT IT HARDER!

And that's it! If that's all you want to know, you can stop reading.

If you want to read about setting up a Dingle, a dual-single speed bicycle with two gearing options, or why you might want to use one, or if you want to read more of my bicycle related ramblings, then please check out the other posts on this blog.

If I get enough hits I might even think about selling advertising space.

*******

Actually there might be a simpler way to remove a freewheel without a removal tool. (Adam's comment below got me thinking about this.)

I've described a method based on the Park Tools method of dismantling the freewheel so you can access the inner body to unscrew it off the hub. The Park Tools method uses a pin spanner to unscrew the freewheel bearing cone, then a vise to hold the inner body to unscrew it. I've said you can do both these things with a hammer and punch.

I made a bit of a mistake when I said you can't overtighten the bearing cone by driving it the wrong way. If you drive it anticlockwise, it will tighten against the inner body of the freewheel. If you keep driving it anticlockwise, and it doesn't break, it will start to unscrew the whole freewheel off the threaded hub. Which is what you are trying to do in the end. You probably can't do this with a pin spanner because the freewheel is usually too tightly screwed on to the hub, but you might be able to do it with a hammer and punch.


So try this. Just put the punch in one of the little holes on the front of the freewheel and drive it ANTICLOCKWISE.... HIT IT HARDED..... it'll just come right off!

Sunday 23 September 2012

Epilogue

A Blog is a strange way to tell a story.

If you start here, at the top, and read down, the story comes in jerking flash backs, beginning near the end, going forward then jumping back before the place you began, then running forward and jumping back further again to the beginning.

If you go to the bottom and read up, it makes sense at first. The first short post fits nicely on the screen, then scroll up to the second post, then the posts get bigger and you're scrolling up and down and you see the pictures in the wrong order and get distracted by a link that you should have already seen and...

...or you could come in somewhere in the middle, probably because you asked google what there was on the internet about "dingle gearing", and read random posts till you get bored or need to do something else.

But if you followed each post in turn from the beginning, you would read the story of my emergence from early parenthood, to re-discover the joy of cycling when my wife bought me a design-your-own multicoloured single speed  bike off the internet. And then the story of its transformation into a custom 2 speed racer, with a fast down hill and flat land gear, and a lower gear for the climb back home. 2 single speeds in one, with gears changed by loosening the rear wheel and moving the chain manually between cogs.

So I rode like that for a while. 52T front cog / 16T rear freewheel for the down hill, then change to 48/18 for the climb home. And I got fitter, and stronger, and after a while I could get back home in the high gear. In fact I could go most of the places I wanted to go in the high gear, even on a longer loop across the river and around to the university, with the final climb over the bridge and up to the top of Highgate Hill with my legs burning and chest heaving. At least it got to a point that, if I needed a lower gear, 52/18 was enough of a step down, and I took the 48T chain ring off. I experimented for a while with 170mm cranks, but I felt like I could spin the 160s faster so I went back to them.

And for a while that was the set up for the Dornoch Dingle. Big green frame with track forks, 52T chain ring on 160mm cranks, 16/18, 2 speed freewheel on the back, aero rims with skinny red tyres, a slight rise to straight handle bars with small bar ends, and a hard, narrow, white saddle.

Then winter came and I got the flu. I started riding more on the 18T than the 16T sprocket. Then I got sick again, that tends to happen when you have small kids, and I let the dingle hang in the garage for a while.... and a bit longer... and then, when I was starting to feel better, but not up to full strength yet, and looking for something to do... I built another bike.

Which I'll tell you about before this.

Tuesday 17 July 2012

Truing and bearing the cones-equences

I rode around on my new front wheel for a while. Then one day I was sitting in my office at work, when I noticed that one of my spokes was loose enough to rattle with my fingers.

I know enough to know that's not good. So I thought I'd better do something about it. That meant buying a spoke wrench... and while I as at it I though I might get some cone wrenches as well.


I tightened up the loose spoke, but then I was in dangerous territory. Now I had the tools to do some proper damage. Truing wheels and adjusting wheel bearings seemed like serious bicycle mechanicery. Sheldon calls truing the "trickiest" job in bicycle maintenance, "a person who tries to 'touch up' a slightly out-of true wheel without proper knowledge could turn an imperfection into a disaster".

I talked to my hardcore Canadian cycling buddy about it. She agreed it was a tricky business. She told me about her ex boyfriend who spent hours doing cones and tweaking his spokes (she mimed him inhaling thoughtfully and stroking his chin). But when she tried it, she thought she'd done a good job, only to have her wheel EXPLODE when she bumped down off a gutter!

There are a few points to ponder in that story:
  • hardcore cycling buddys can be girls.
  • "cones" may have more that one meaning, but more about hub adjustments in a moment.
  • why no nipple jokes?
  • why would a badly trued wheel EXPLODE!?
There are four things you can adjust with a spoke wrench, vertical true, lateral true, dishing and spoke tension. To make things complicated, every adjustment you make with the wrench changes all four at once. So truing has to be a process of many slight adjustments and readjustments, with much careful reflection and deep consideration of each move ... just the sort of thing that people who fiddle with bicycles love. With a mug of tea for me!

Sheldon Brown says the best way to learn truing is to start by building wheels from scratch, better than trying to repair dented and damaged rims, but I've started by just making small adjustments to some new wheels that have loosened up a bit after they've first been ridden. I have no truing stand, so I put the wheel on the upside down bike, with the tyre and tube off. I use the brake pads to check lateral true and hold a straight edge against the frame to check vertical true. I haven't really worried too much about dishing with the small adjustments I'm making. Perhaps I'll need to get a dishing stick next. Sheldon gives highly detailed instructions of what to do. Just remember the saying "better is the enemy of good", which I hear from an orthopedic surgeon, and know when to stop.


I suspect my friend's EXPLODING wheel was due to a problem with spoke tension. There is such a thing as a tensiometer which measures spoke tension, but I've just tuned them all to around F# above middle C (John Allen has a nice table of spoke lengths,  and musical pitches for butted and unbutted spokes).

After that, servicing and adjusting cone and cup hubs was easy. Apart from the worry of dropping ball bearings all over the floor, it essentially involves tightening small nuts against each other on a treaded axel with some funky little skinny wrenches. With small adjustments I tighten the cones just enough to eliminate any play from side to side. Sheldon says most bicycle hubs are adjusted too tight. Quick release clamps compress the axel and tighten the bearing a tiny bit so you can leave a tiny bit of play and check that it is gone when the wheel is on the bike.


So I trued and adjusted my wheels. What was the worst that could happen? Catastrophic failure at high speed, throwing me into on-coming traffic, a severe head injury and the rest of my life in a coma?


No. But I have gotten a little addicted to fiddling with my wheels. It's great to pick up your bike, give the wheel a flick and watch it spin 4 EVA. But with the cones adjusted so finely, I have to keep checking that they haven't loosened off and started rattling. I now realise that the hours I spent as a youth adjusting the cantilever brakes on my hard ridden mountain bike, would have been better used carefully straightening out my lumpy rims. And I've found that riding along looking down at a freshly trued, radially spoked, front wheel, rotating but almost looking like it's not moving, is quite mesmerising. I have to remind myself to look up.... another way to end up in on-comming traffic.